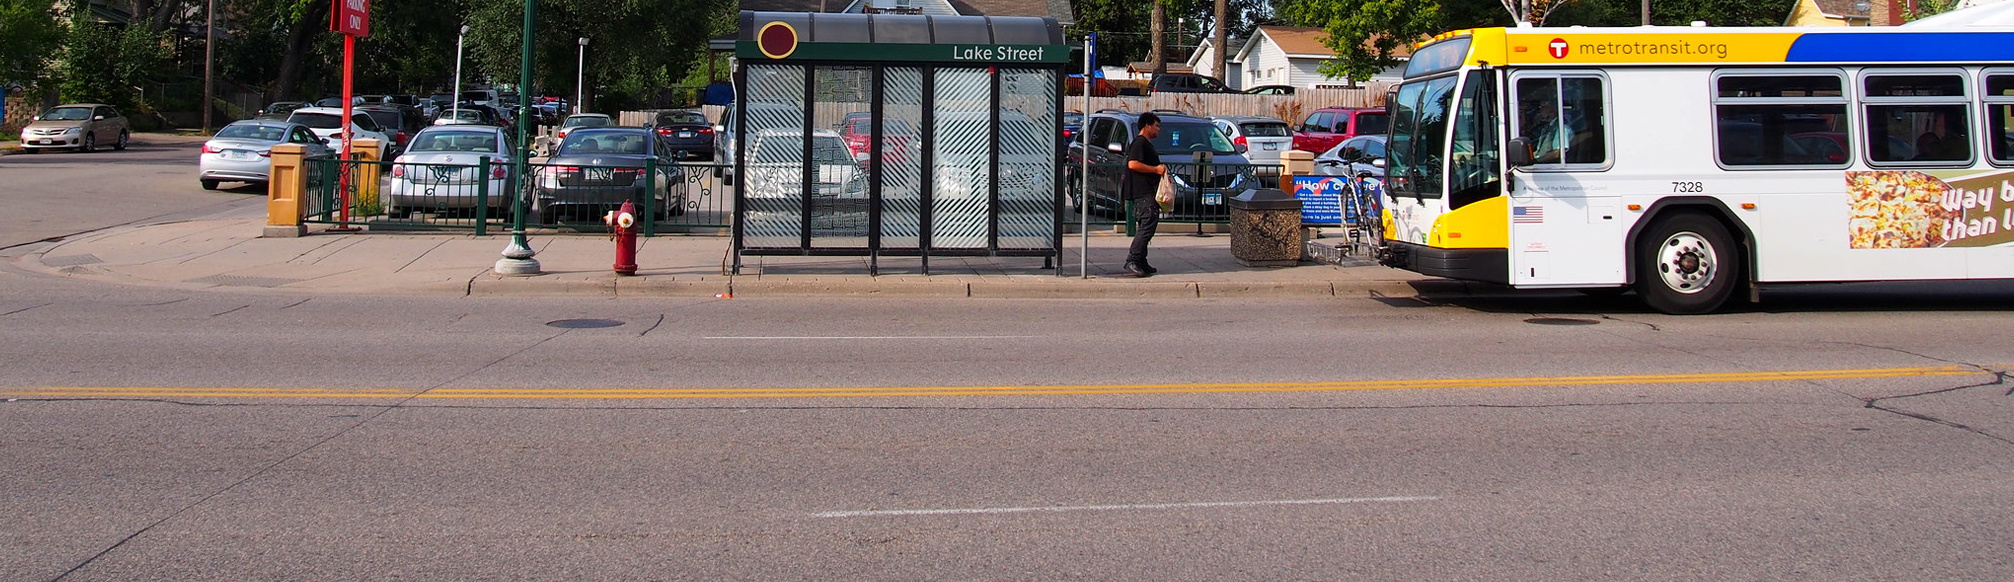
Regular-route bus stops are served by local and express bus service and are the most common in the transit system.
Introduction
Regular-route bus stops are served by local and express bus service and are the most common in the transit system. Stops that are planned for future Bus Rapid Transit service should use the Bus Rapid Transit stations guidance. Metro Transit’s Shelter Guidelines cover placing and removing bus shelters, shelter lighting, and shelter heating. Additional details on Metro Transit shelter placement are available here. Designers should work with Metro Transit and Traffic and Parking Services staff to determine preferred locations for bus stops and shelters on any street reconstruction project while balancing other demands in the corridor.
Design Considerations
|
Accessible boarding area
|
At the front door zone of every bus stop, a concrete accessible boarding area must be provided for ADA access. It must have a clear length of 8’ minimum, measured perpendicular to the curb or roadway edge, and a clear width of 5’ minimum, measured parallel to the roadway (see figure 3.5B.1). This space is where passengers enter and exit the bus, and where bus operators deploy the ramp for passengers using a mobility device, such as a wheelchair.
Figure 3.5B.1: Accessible boarding area (ADA pad)
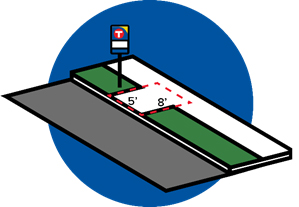
Source: Metro Transit
|
|
Back-door access zone
|
A back-door access zone is also preferred. Designers should collaborate with Metro Transit to determine if 40’-long buses or 60’-long articulated buses serve the corridor to locate boarding areas appropriately. Figure 3.5B.2 shows the door zones at local bus stops with common Metro Transit buses serving local routes. See also bus stop clear space.
Figure 3.5B.2: Door zones and bus stop clear space at local bus stops with common Metro Transit buses
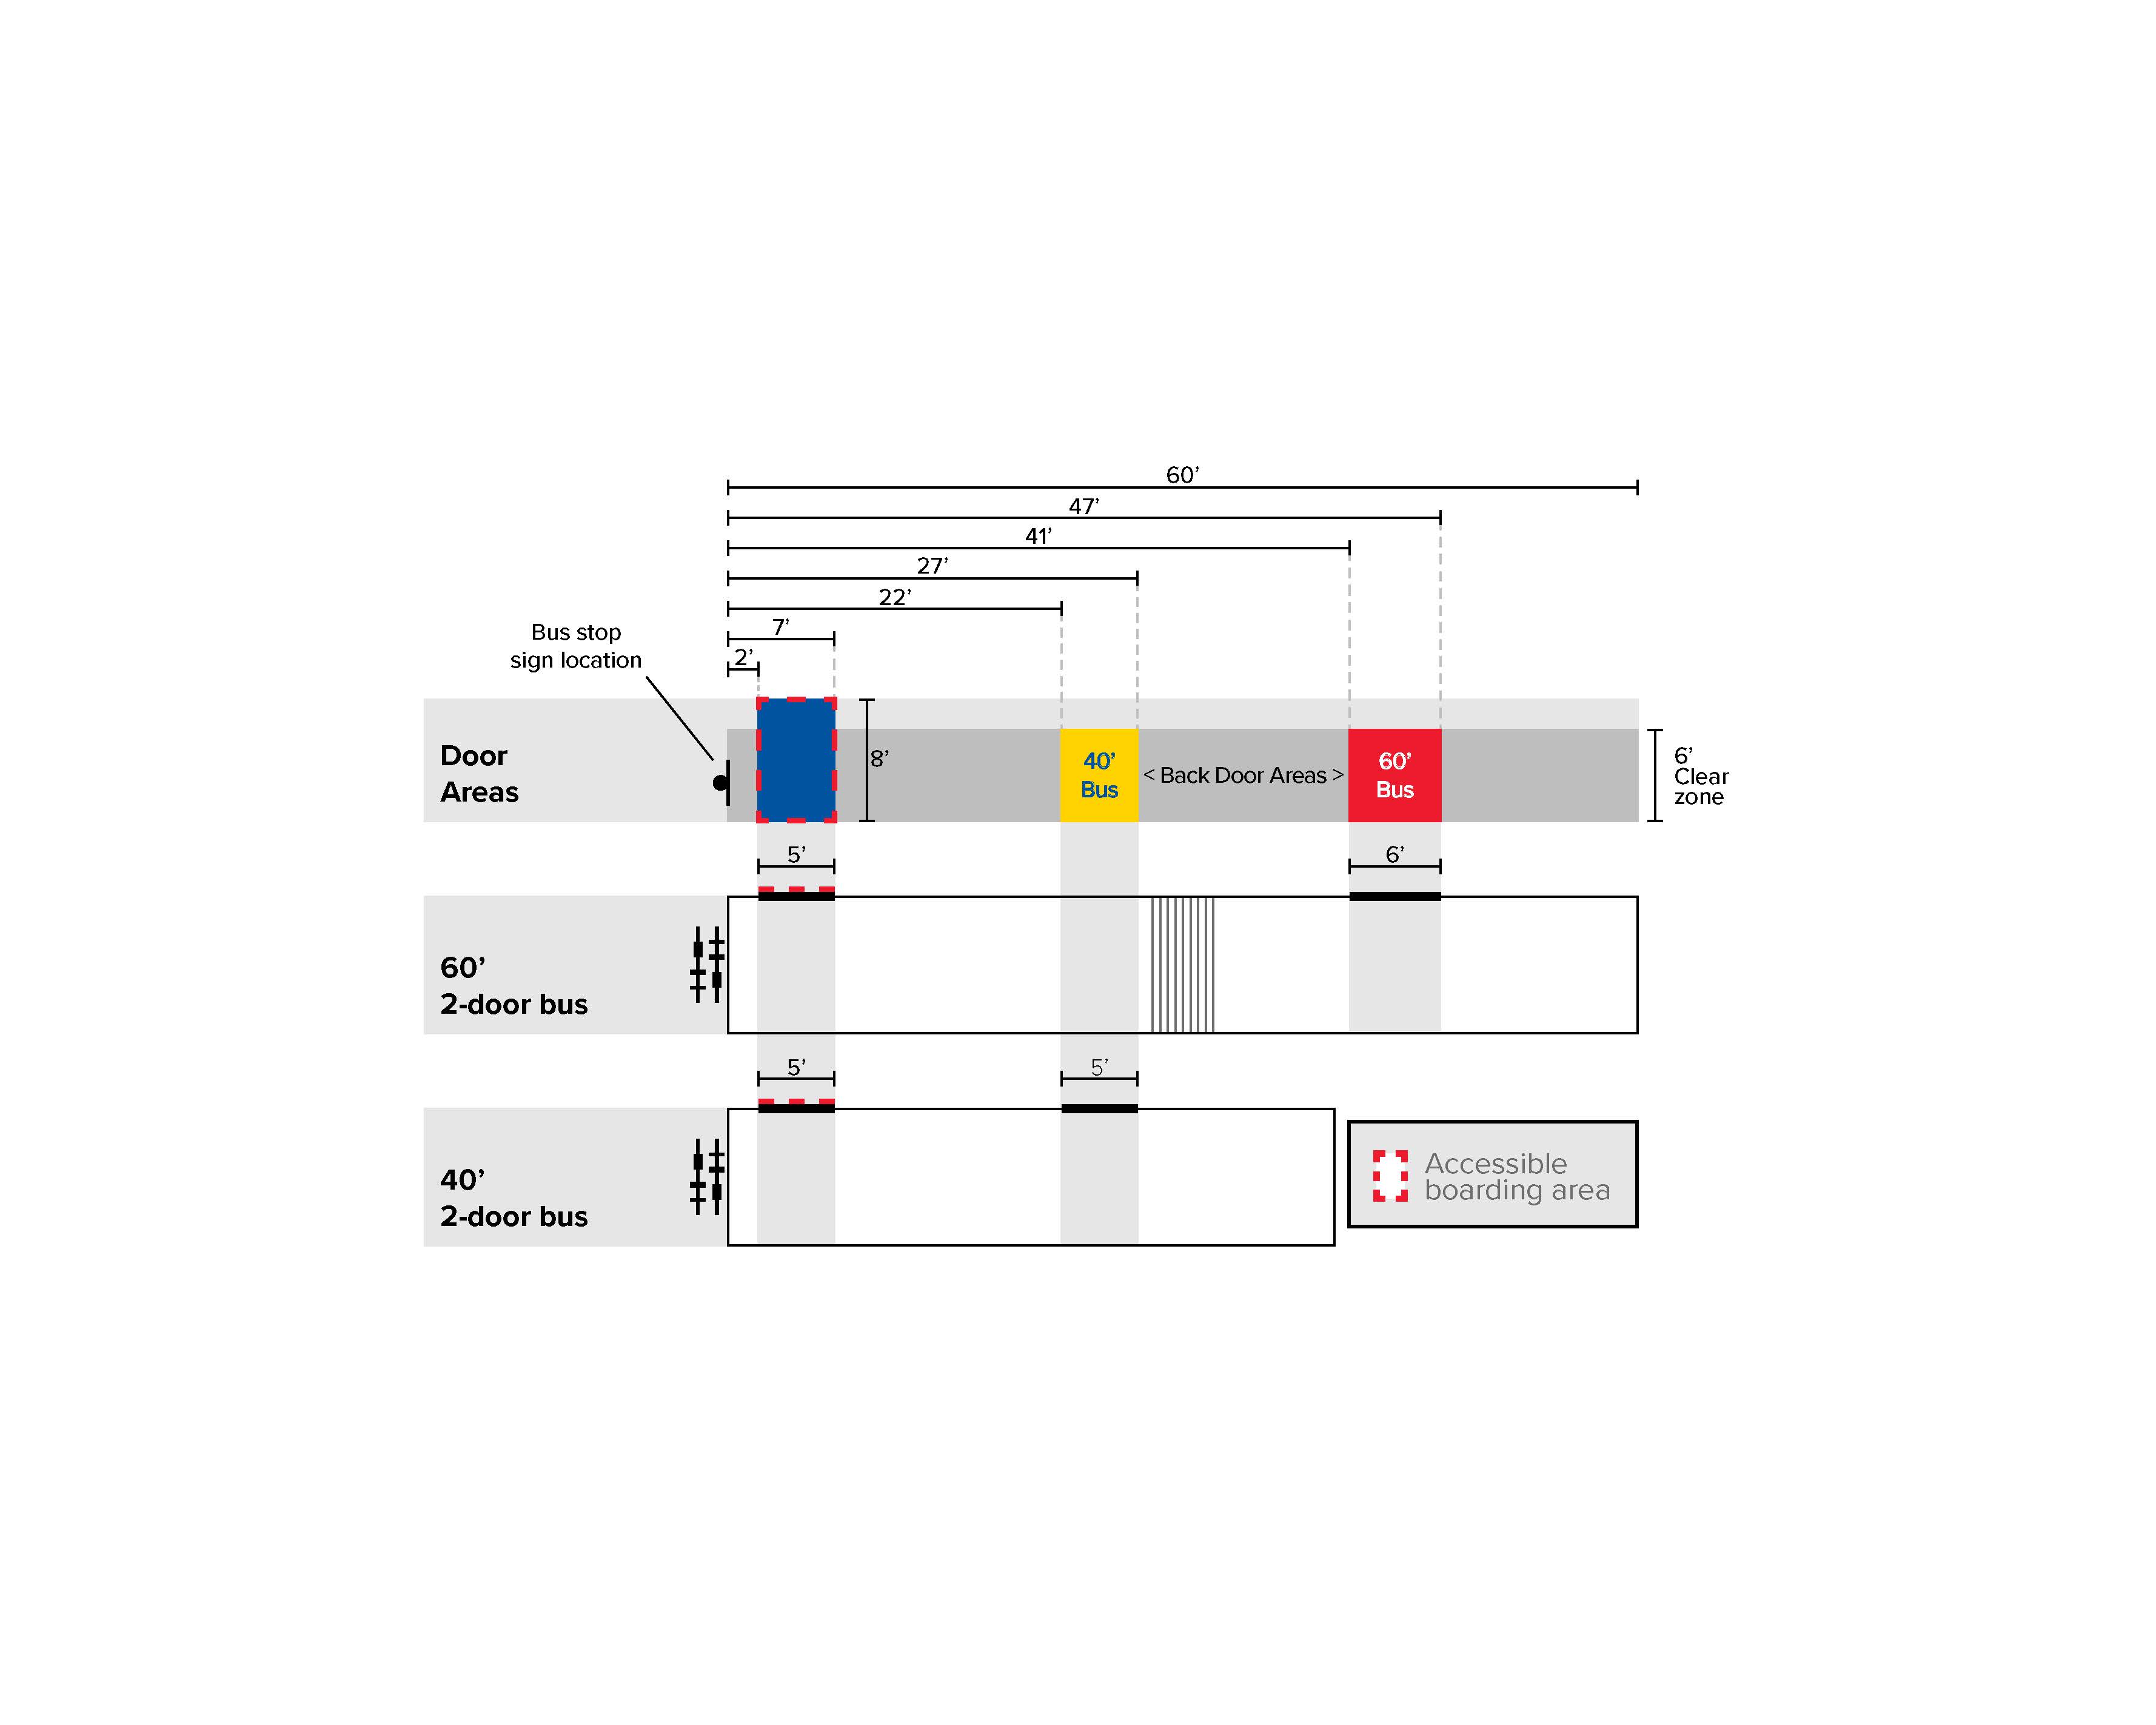
Source: Metro Transit
|
|
Bus stop sign
|
The bus stop sign indicates where bus operators will stop, where people will wait, and where passengers will enter/exit the bus. Metro Transit bus stop signs are site specific and include the unique bus stop ID, route number of buses serving the stop, and NexTrip information (see Figure 3.5B.3).
- The bus stop sign should be located adjacent to the accessible boarding area; it should not obstruct the accessible boarding area. The bus stop sign can be installed in grass or a paved surface.
- Construction projects that impact an existing or future bus stop should coordinate with Metro Transit to ensure sign and pole are located specifically to anchor the bus stop zone.
Figure 3.5B.3: Metro Transit local bus stop sign example
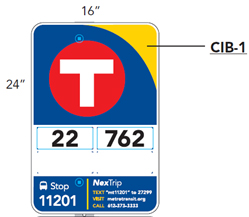
Source: Metro Transit
|
|
Preferred bus stop clear space
|
- The bus stop clear space includes the bus stop sign, accessible boarding area, space for a shelter, and other streetscape amenities.
- A 6’ wide bus stop clear space behind the curb along the full length of the bus stop area is preferred to serve passengers waiting, queuing, and exiting the bus (see Figure 3.5B.4).
- The bus stop clear zone may be longer than one bus if the stop is designed for two buses to serve the stop simultaneously.
- A full length 6’ bus stop clear space may not always be feasible or preferred depending on bus loading and unloading volumes and other demands in the area, including pedestrian clear zone, protected bike lane, and greening.
- The bus stop clear space may also be combined with the pedestrian clear zone for the sidewalk (see sidewalk zone design guidance for more details).
- The bus stop clear space is generally free of vertical obstructions with the exception of bus shelters, trash/recycling receptacles, benches, lighting, and columnar trees. This helps ensure that transit riders exiting through the rear door can do so without obstruction or difficulty.
- Common street furniture items that improve the public realm but should generally be located outside of the bus stop clear zone include: landscaping boxes and planters, e-scooters, bikes and bike racks, café and patio seating, and retail sandwich boards.
- Shoveled snow should be stored outside the bus stop clear zone.
- Pavers are discouraged in the bus stop clear zone as they can heave and become trip hazards. Additionally, Metro Transit shelters cannot be installed on pavers.
- Adjacent development or other roadway construction projects can impact the bus stop clear zone. Projects should coordinate with Metro Transit for replacing the bus stop.
- See also guidance for placement of elements in the sidewalk zone.
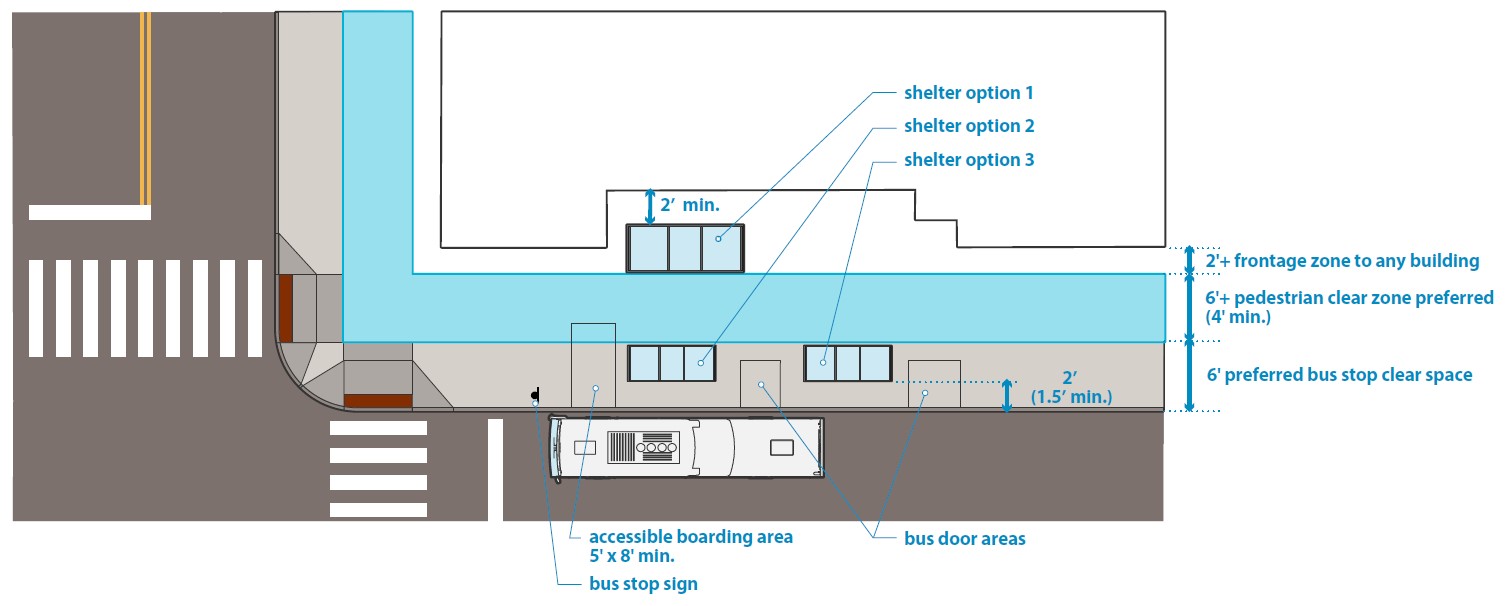
Figure 3.5B.4: Bus stop zone with shelter location options
|
|
Shelter location and design
|
- Shelter placement. Figure 3.5B.4 shows three common shelter placement options. Shelters can be placed in the frontage zone or boulevard and furniture zone, depending on demands in the corridor. Locating the shelter in the frontage zone is typically preferred, but is often not possible because of constraints (see sidewalks guidance for additional details on the frontage zone and boulevard and furniture zone).
- If a shelter is being sited with its back to the curb (up against a travel/parking lane), it needs to be setback from the face of curb 1.5’-2’ to avoid conflict with bus mirrors.
- If a shelter is being sited with its back to a building or retaining wall, it needs to be setback from the structure by 2’ to ensure technicians are still able to maneuver between the structures to change glass panels.
- If a shelter is being sited immediately adjacent to a protected bike lane, shared use path, or trail where people will be biking, a 2’ clearance should generally be used between the shelter and the bikeway, although narrower can be considered in constrained situations. See guidance for bus stops and bikeways for more information.
- Shelter options. Metro Transit’s shelters vary in length and depth from 2’ x 8’ to 6’ x 12’. See here for detailed shelter options.
- Pedestrian access.
- Designers should work to maintain recommended pedestrian clear zone and frontage zone widths adjacent to shelters as outlined in the sidewalk zone design guidance. A 6’ or wider pedestrian clear zone is recommended for every street type. In constrained environments, narrower than 6’ can be considered although every effort should be made to retain at least 5’ pedestrian clear zone width. A minimum of 4’ wide pedestrian clear zone must be maintained throughout to serve as the ADA-required pedestrian access route, although this should only be used in rare situations for short stretches in constrained right of way where every consideration has been taken to narrow all other street zones.
- A minimum of 6’ of sidewalk width (frontage zone and pedestrian clear zone together) is required between a building and a vertical object like a transit station to meet ADA requirements, although this minimum should only be used in rare constrained situations.
- Whenever possible, a straight pedestrian clear zone should be maintained adjacent to transit shelters.
- The bus stop clear space boarding area and the pedestrian clear zone can be combined and the shelter can be placed in the frontage zone along the edge of the street right of way.
|